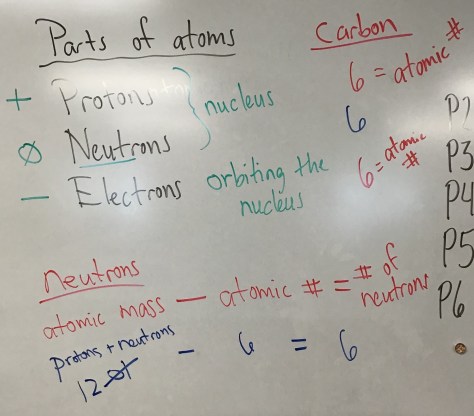
Chapter 3 begins with a historical study of how early chemists used experimentation and reasoning to assemble models of the atom. The Lesson 11 PowerPoint provides key vocabulary around the components of the atom (proton, electron, neutron, and nucleus). To help bring these concepts to life, we watched the Crash Course video below:
Click on the CompoundChem.com infographic below to enlarge the graphic. There is an excellent article accompanying the infographic as well that is highly encouraged reading.
Wonder what an atom actually looks like? Using a “quantum-style” microscope, atoms of hydrogen can be seen – check out the article “Smile Hydrogen, You’re on Quantum Camera” from New Scientist magazine (2013).
Class began with a video about Dmitri Mendeleev and the Periodic Table.
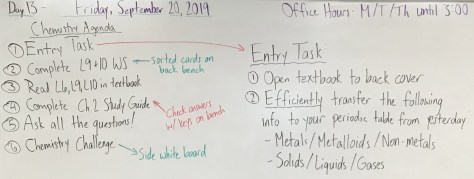
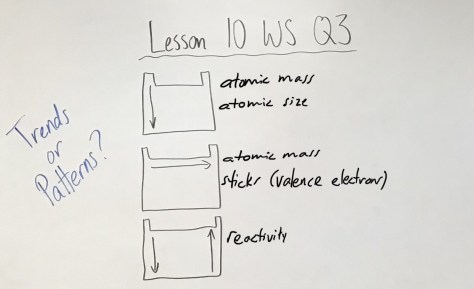
Next, students went back to work in small groups, tackling the Lesson 10 worksheet with their groups from Lesson 9. They reconstructed their periodic tables using the cards from Lesson 9, then identified trends in the table to fill in the worksheet. After completing the worksheet, students received a paper copy of the Periodic Table to use on exams and quizzes and then had the remainder of the class period to read and take notes on lesson 10 using the textbook as well as the Power Point slides.
Notes from class:
Current Periodic Table:
Bonus Learning Opportunity
For pleasure, students should consider reading a few pages from Sam Kean’s book titled The Disappearing Spoon. Click this link for the section of the book about Ytterby Lanthanides. It begins with the sentence “In 1701, a braggadocian teenager…” and you will need to click the hyperlinked blue “Page >>” in the upper left hand corner to reveal the full reading passage. Continue reading through the next three full pages ending in “…Galapagos Island of the periodic table.” You will be glad you did!
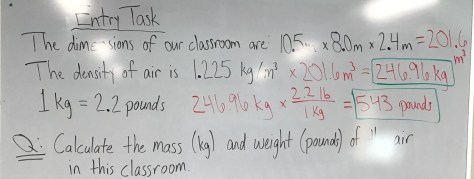
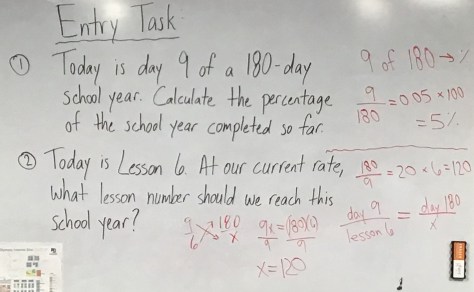
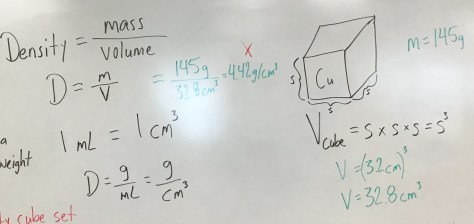
Class began with an entry task requiring students to calculate volume, use volume and density to calculate mass, and then to conduct a unit conversion. The work is shown below.
Next, students received copies of progress reports and work from Chapter 1. Until students gain access to Synergy, progress reports will be provided after each chapter quiz.
For our work today, we began our exploration of the Periodic Table by constructing our own. In Lesson 9, students walk the path of the famous Russian chemist Dmitri Mendeleev who assembled the first predictive periodic table using the chemical and physical properties of the 63 elements known back in the 1860s. We ended class yesterday with a video showing the reactivity of alkali metals upon contact with water:
The remainder of class time was available to read Lesson 9 in the textbook and answer the Lesson 9 questions in the Chapter 2 Study Guide.
Extend Your Learning!
Ever wonder how the elements got their names? Some are named after recognizable people or places, while others…learn more by reading The Strange Stories Behind Weird Element Names, then watch the PBS video How the Elements Got Their Names at the end of the article.
For our first lesson of Chapter 2, students took notes from the Lesson 6 PowerPoint to introduce students to chemical names and symbols. Students then had the remainder of the class period to make observations about a wide variety of elements from a vintage science kit unearthed prior to the move out of the old Highline High School last spring.
Students had the remainder of the class period to read Lesson 6 in the textbook, and then answer the Lesson 6 questions in the Chapter 2 Study Guide.
Notes from class:
Day 2 – 9/17/19
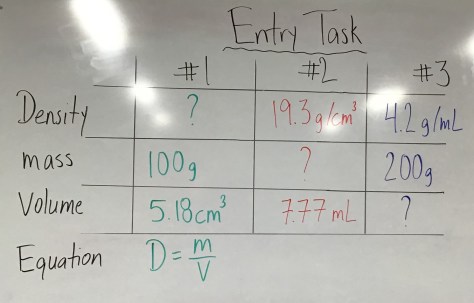
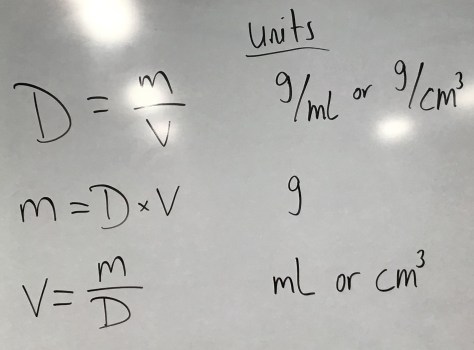
Class began with an entry task designed to practice how to calculate density, mass, or volume when given two of the three pieces of information:
After the entry task, we reviewed the Chapter 1 quiz. Students then had the remainder of the class period to complete the Lesson 6 observations and summaries.
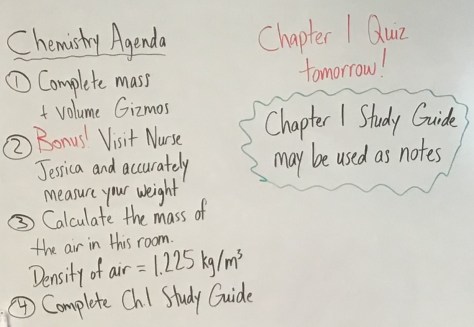
In preparation for our quiz tomorrow, students had the opportunity to complete the mass and volume Gizmos, visit Nurse Jessica to earn a bonus point by successfully measuring their weight on her double-beam scale, complete the Chapter 1 study guide, or work through any of three additional bonus learning opportunities (pictured below).
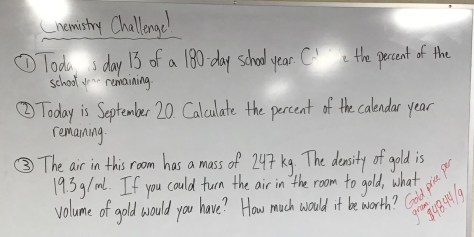
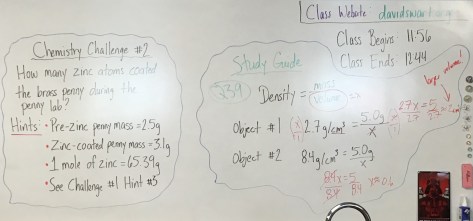
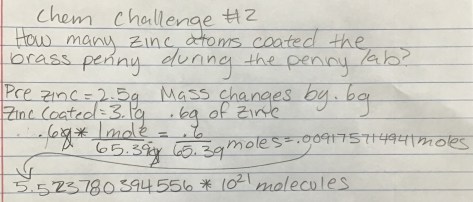
Chemistry Challenge Q2 – Answer by Team Platinum, P5
Our work today uses the concepts of mass and volume from lesson 4 and connects them into a formula used to describe a physical property of matter: density. We can calculate density using the equation density = mass / volume. Students should come away with an understanding of what density is and how it can be used to provide evidence in support of the identity of a substance. Students should also recognize the limitations of density in making such a determination.
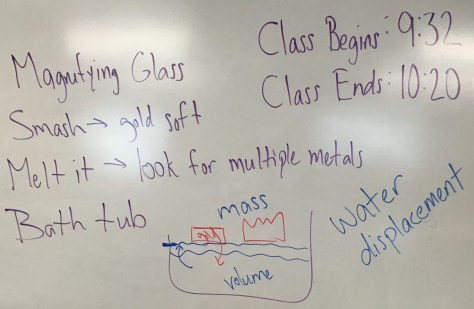
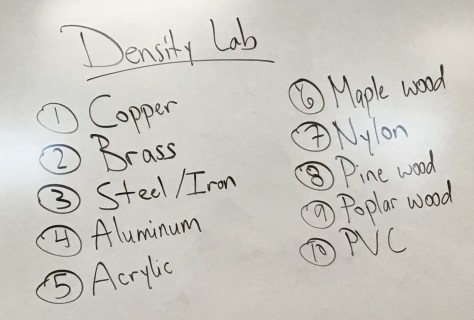
We will begin the lesson with the ChemCatalyst from the Lesson 05 PowerPoint. Students will learn the difference between intrinsic and extrinsic properties of matter, and then they will work with their element groups to calculate the density of a variety of different materials using both rulers and water displacement to measure volume.
Students who finish early may complete the mass and volume Gizmos from yesterday and/or read Lesson 5 from the textbook in preparation for the quiz on Friday covering Lessons 1-5.
Notes from class:
Extend Your Learning!
According to Ptable.com, the density of gold is 19,300 kg/m³. According to your textbook, the density of gold is 19.3 g/cm³. Use dimensional analysis to connect the densities, given that there are 1,000 grams in 1 kilogram (1,000 g = 1 kg) and 1,000,000 cm³ in 1 m³. The video below can help you through the process:
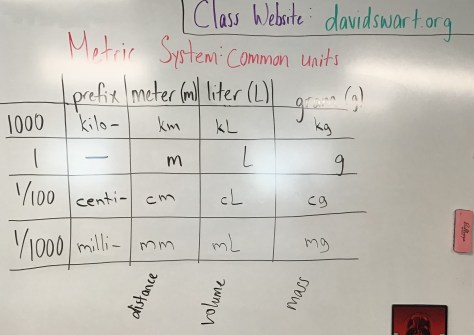
For lesson 4, we will explore the concepts of mass and volume. We will briefly discuss the ChemCatalyst from the Lesson 4 PowerPoint and students will be reintroduced to the metric system. To help reinforce the learning, we will embrace the power that is Pete Hendley:
We will discuss common metric system prefixes and learn the difference between milli- (1/1000), centi- (1/100), and kilo- (1000) as applied to the base units of meter, liter, and gram. For the remainder of the lesson, students will work with a partner to complete Activity A for both the Triple Beam Balance and Measuring Volume Gizmos on the Explore Learning website.
Enter the class code (written on the white board).
Click the Enroll in Class button.
Choose “I need to create…” option.
Enter your First and Last name (not email!)
Use your student numer (s-#######) as your username.
Enter birthdate as password (MM/DD/YYYY)
Click “Submit”
Launch the Triple Beam Balance Gizmo
Complete the Student Exploration worksheet
Students who complete Activity A of both Gizmos should continue working on Activity B of the Measuring Volume Gizmo.
Class Notes:
Bonus credit opportunity! Put your triple-beam balance skills to the test and head to Nurse Jessica’s office and measure your weight on the clinic scale. Your data stays private and you earn a bonus point with her verification of you successfully achieving balance.
For lesson 3 today, students will write a response to the ChemCatalyst questions in the Lesson 03 PowerPoint. Students should leave class today able to share the definition of matter, and be able to differentiate between what is and is not matter. To achieve that learning, students will work in groups to complete the Lesson 03 Student Worksheet.
After completing the Lesson 3 Worksheet, students verified access to the digital version of our chemistry textbook:
Students will read through Lessons 3 and 4 with remaining class time or as homework. Note: we have our first quiz this Friday covering textbook lessons 1-5. To help prepare for the quiz, students will receive a copy of the Chapter 1Study Guide.
Keep Learning! Is light a particle or a wave? The TED-Ed talk below will help us answer the question of whether light is matter or not matter. Watch the video and answer the question for yourself: is light a particle or a wave? Use evidence to support your claim!
For our third day of class, a rare full-day Friday, we began with the question: What is Chemistry? Students shared what came to mind when they thought of chemistry, and we crafted those ideas into a simple definition: Chemistry is the study of matter.
Next, students observed two materials on their lab benches – a block of copper and a beaker with zinc shot. Without being told the identity of either, students wrote down observations about the materials as a team, and then shared out observations as a class in an effort to describe and then deduce the identity of the materials.
Finally, the class was led through a demonstration of the Penny Lab. Following the steps outlined on page 6 of Lesson 2 of the textbook (A Penny for Your Thoughts), we immersed a pre-1982 penny (95% copper, 5% zinc) in a warm beaker of sodium hydroxide (2 M, about 40 mL) and zinc shot (enough to cover the bottom of a 150 mL beaker). After watching the penny change color to silver, tongs were used to transfer the penny to cool water. The penny was then transferred back to the hot plate (still set to 4) where it changed to a gold-copper color. The penny was placed back in cool water where it completed the transition to having a gold appearance. Throughout the demonstration, students worked the Lesson 2 worksheet. During the longer steps of the demo, students read through Lessons 1 and 2 of the textbook and worked through the Lesson 1 Exercise questions focusing on lab safety.
We concluded the class period with a discussion of what students observed. The discussion generated an impressive number of hypotheses and testable follow-up questions, so we may revisit this as a student-led lab in the near future (once all those safety contracts are turned in!). Students clearly understood that the gold color of the penny was not an indication that the penny had literally turned to gold – the gold color is attributed to increasing the percentage of zinc as part of the penny, which manifests as a gold color after heating the penny to integrate the zinc atoms within the copper atoms of the penny and thus creating brass!
Students who would like to watch the Penny Lab in action should check out the video below:
For our second day of class, students worked in groups to complete a scavenger hunt-type activity in which they had to locate 30 different items within our classroom related to our work this year. The hunt focused on locating safety equipment, important classroom landmarks, and key supplies and consumables. Students drew a floor plan of the classroom and labeled the locations of all identified items from the hunt. Students also received a copy of the Syllabus and Safety Contract and time to read over both before taking them home to get signed. Both documents (signed by the student and a parent/guardian) are due Monday. Students who return both copies signed tomorrow will receive bonus credit.


You must be logged in to post a comment.