Category Archives: Chemistry

Matter, Atomic Structure, and Bonding: The Periodic Table

We continued our exploration of the Periodic Table by working through the first 13 slides of the Lesson 10 PowerPoint.  Students then worked through most of the Lesson 10 worksheet with their groups from yesterday.  We will complete both the slide deck and the worksheet activity tomorrow.

Update 10/2 – Students completed the Lesson 10 worksheet in class and were also assigned the Lesson 10 questions from the textbook.  In advance of Monday’s Chapter 2 quiz, students received practice copies of the Chapter 2 Multiple Choice and Short Answer quizzes.  Students were also encouraged to work through the Chapter 2 review questions on page 49 of the textbook.  The review questions and practice quizzes are not assigned and do not need to be turned in for credit.

Matter, Atomic Structure, and Bonding: Properties of the Elements

Students took notes from the Lesson 9 PowerPoint, learning about the concepts of atomic mass, protons, and neutrons, and isotopes.  Students also learned about electrons and the concept of electronegativity.  They then worked together in groups of four to complete the Lesson 9 Worksheet.  For homework, students were instructed to complete the worksheet, answer questions 1 and 2 from the end of Lesson 9 in the textbook, and then to read Chapter 10 in the textbook.  Notes from the whiteboard are pictured below.

IMG_7054

Matter, Atomic Structure, and Bonding: Hunting the Elements

In preparation for Lessons 9 and 10 in which the Periodic Table is introduced, students watched the first half of the PBS Nova video, “Hunting the Elements” – we finished at the 48 minute mark today.  Students will have a substitute teacher tomorrow and will finish the video in class.

Updated 9/29: Special thanks to our substitute, Mr. Burke.  He informed me students were able to watch through the 1:29:00 mark of the video.  Students are encouraged to finish the video outside of class.  Students should read Lesson 9 before class tomorrow and come prepared to extend their learning of the Periodic Table.

http://www.youtube.com/watch?v=G04h9kK3ZJs

Matter, Atomic Structure, and Bonding: Conservation of Mass Lab

Following up on the conservation of matter lesson from yesterday, students worked in groups to conduct a similar experiment to the baking soda and vinegar demonstration.  Today, students were tasked with experimentally testing the law of conservation of mass by mixing known masses of vinegar and Tums (calcium carbonate), then capturing the carbon dioxide released in the experiment in a balloon placed over the flask.  They were tasked with determining how much carbon dioxide is produced but the challenge was that, unlike the demonstration yesterday, they could not simply allow the carbon dioxide to escape into the atmosphere.  After much trial and error, students gained practical experience working with various pieces of glassware, reagents, the digital balance, thinking through order of experimental operations, recording observations, and sharing their understanding of what was happening during the chemical reaction.  We concluded with a discussion of the chemical reaction (pictured below).  Students will meet tomorrow in the library computer lab to compile their findings into a lab report.  Students were encouraged to take pictures or video into their investigation today and those can be incorporated into the lab report.

IMG_7043 IMG_7044

Matter, Atomic Structure, and Bonding: Conservation of Matter

We worked through the remainder of the Lesson 8 worksheet today, tracing copper as it moved through the copper cycle and learning about the Law of Conservation of Mass in the Lesson 8 PowerPoint.  We concluded the class with a demonstration.  Most students were familiar with the chemical reaction of adding vinegar and baking soda together (it bubbles!).  Students looked up the chemical formulas for both reagents and we discussed the products that are generated from combining the reactants (baking soda and vinegar).  Students learned that the products of the reaction are sodium acetate, water, and carbon dioxide gas.  The following question was posed: If a known amount of baking soda and vinegar were combined together in an open container on a scale, what would happen to the final mass of the products remaining in the container on the balance.

For the experiment, 5 grams of baking soda were added to 59.6 grams of household vinegar (5% acetic acid in water) in a flask placed on a digital balance.  After a few minutes, the reactants stopped bubbling, and the mass of the remaining contents in the flask were found to be 57.5 grams.  Therefore, the difference of 2.1 grams (59.6 grams minus 57.5 grams) should be the mass of the carbon dioxide gas released into the atmosphere.  Tomorrow, students will conduct their own experiments and be tasked with using our available technology to evaluate the Law of Conservation of Mass for a given set of reactants.

Matter, Atomic Structure, and Bonding: The Copper Cycle

We began class by assembling a list of the elements and compounds observed yesterday:

Vial Name Chemical Formula Description
1 Aluminum Al silver pebbles
2 Silicon Si shiny dark silver jagged rocks
3 Zinc Zn bluish-grey with patina
4 Sulfur Si yellow shards, rotten egg smell
5 Zinc Zn corroded
6 Zinc Zn silver frosted corn flakes
7 Sodium Chloride NaCl clear liquid
8 Trisodium Phosphate Na3PO4 clear liquid
9 Sodium Nitrate NaNO3 clear liquid
10 Sodium Fluoride NaF clear liquid
11 Aluminum Chloride AlCl3 misty blue liquid
12 Copper Chloride CuCl2 transparent blue
13 Copper Cu copper colored beads
14 Calcium Sulfate CaSO4 white powder
15 Magnesium carbonate MgCO3 Baking powder (creamy white)
16 Vinegar (acetic acid) C2H4O2 Sour smell, clear liquid
17 Calcium Carbonate CaCO3 Large greyish-white rough rocks
18 Calcium Chloride CaCl2 Compressed white pellets, dusty

Note: The numbers in the chemical formulas should be written as subscripts.

After the review, students received the Lesson 7 worksheet, the copper cycle experimental steps handout, and the Lesson 8 worksheet.  We decided to skip the lesson 7 worksheet because we do not currently have access to reliable fume hoods (required for the copper cycle lab) and because the lesson 8 worksheet includes students responses from the lesson 7 worksheet.  After reviewing the content in the Lesson 7 PowerPoint, we watched two versions of the Copper Cycle Lab on YouTube (below):

Students should read through Lessons 7 and 8 in the textbook and complete the questions at the end of the lessons, and be prepared to ask questions about the content in class tomorrow.

Matter, Atomic Structure, and Bonding: Chemical Names and Symbols

We began the week with Lesson 6, the first lesson Chapter 2.  Students were introduced to the language of chemistry, learning how chemical formulas for compounds are written as collections of elements.  The Lesson 6 PowerPoint defines several important vocabulary terms and prepared students for the lab activity (Lesson 6 worksheet).  For the lab, there 18 different solid and liquid elements and compounds for students to observe (different from those pre-filled on the worksheet).  The observations consumed the remainder of the class period, and students were asked to read Lesson 6 in the textbook in preparation for completing the lesson tomorrow during class.

Matter, Atomic Structure, and Bonding: Density

Busy day today!  Because of the fire drill yesterday, students used the first few minutes of class to collect data for the lab portion of the Lesson 4 worksheet.  They then finished the worksheet and answered the Lesson 4 questions (#1-11) from page 16 of the textbook.  Finally, students were assigned the Lesson 5 worksheet and questions #1-7 on page 20 of the textbook (we did not cover the Lesson 5 PowerPoint but the content is covered in the textbook).  In preparation for the Chapter 1 quiz tomorrow, students are encouraged to review questions #1-6 on page 21 of the textbook and to work through the Chapter 1 practice quiz.

Matter, Atomic Structure, and Bonding: Introduction to Chemistry

Today in class, we transformed the color of a copper penny to silver and then to gold.  Following the steps outlined on page 6 of Lesson 2 of the textbook (A Penny for Your Thoughts), we immersed a 1979 penny (95% copper, 5% zinc) in a warm beaker of sodium hydroxide (3 M, about 40 mL) and zinc shot (enough to cover the bottom of a 150 mL beaker).  After watching the penny change color to silver, tongs were used to transfer the penny to cool water.  The penny was then transferred back to the hot plate (still set to 4) where it changed to a gold-copper color.  The penny was placed back in cool water where it completed the transition to having a gold appearance.  Students worked through most of the Lesson 2 worksheet in class.  We wrapped up by making a list of questions students had about the experiment (pictured below).  Those questions will form the basis for tomorrow’s lesson, where students will begin to probe how and why the penny changed color and whether the penny actually turned to gold.  Students will write a hypothesis, carefully conduct the experiment documenting the steps they follow (the procedure), and then documenting the results of their experiment.

IMG_7014

Remember, the PowerPoint from Lesson 1 is due tomorrow (9/11) by email.
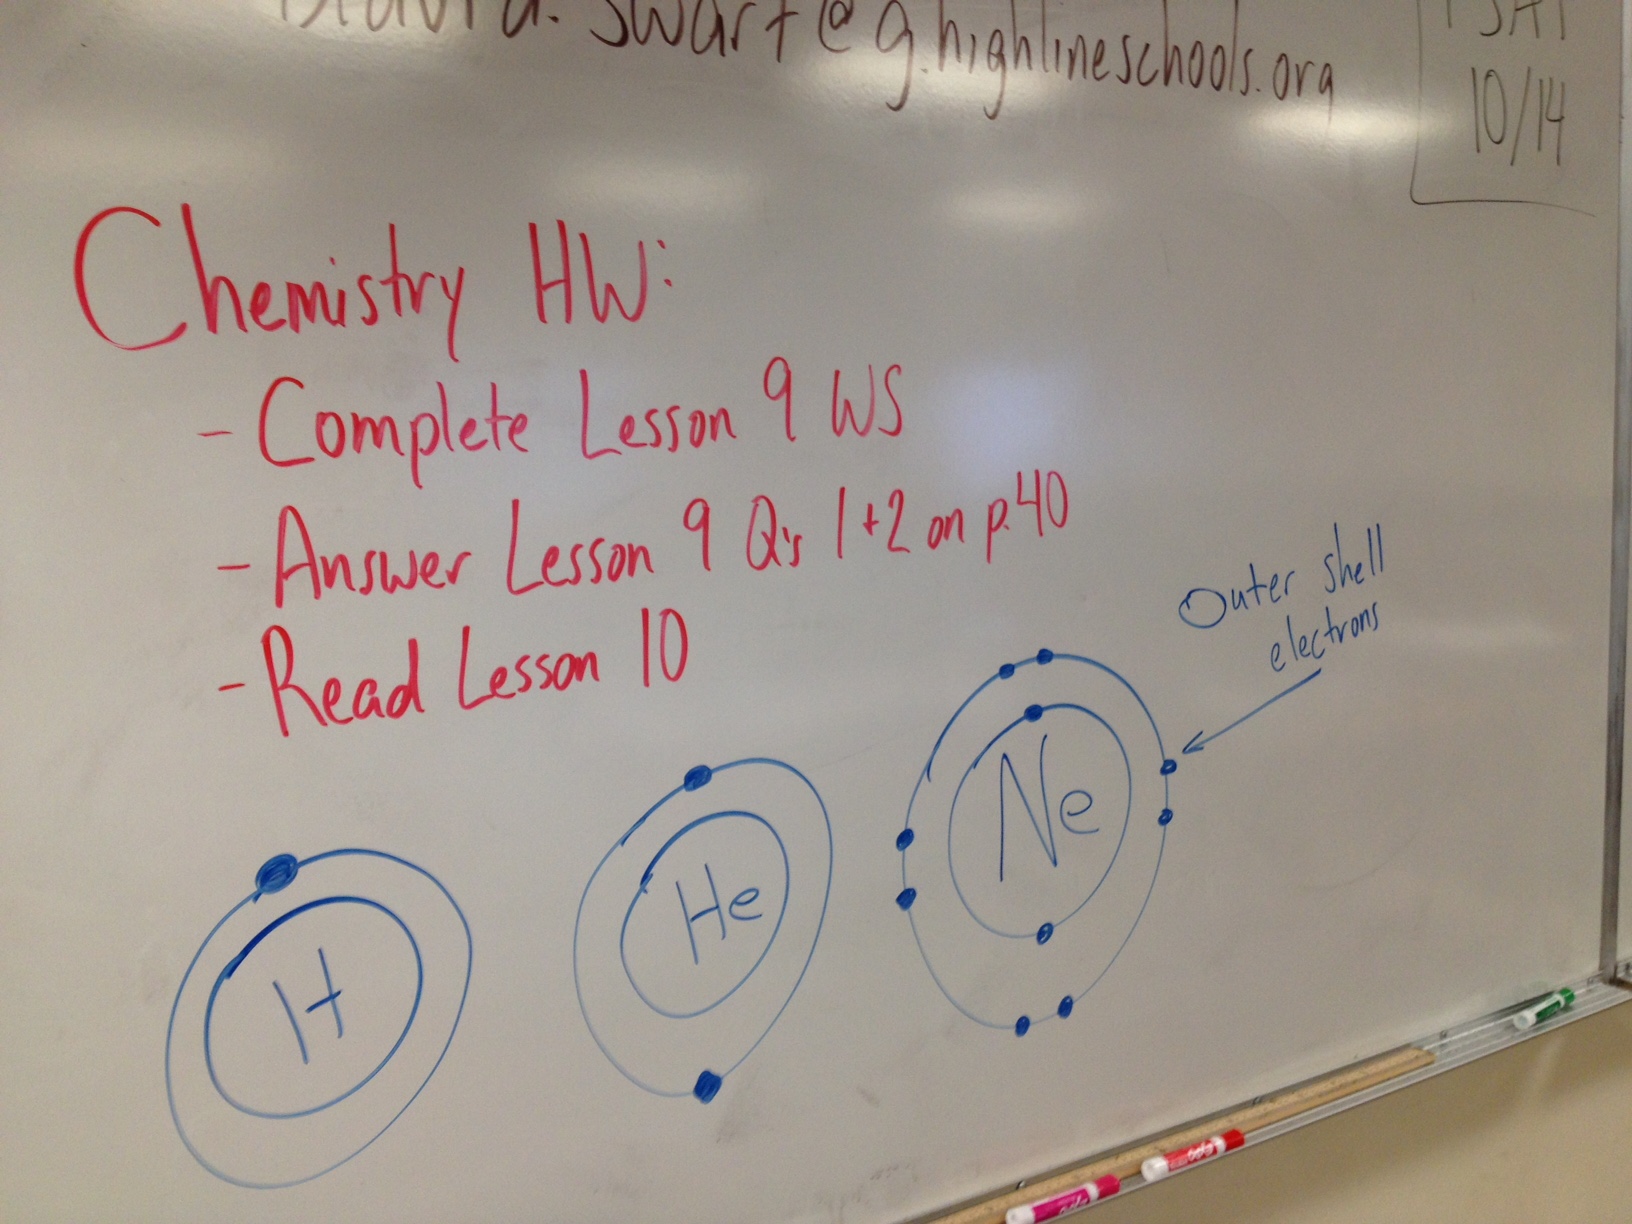
Due Monday (9/14):

  1. Complete the Lesson 2 worksheet
  2. Answer questions 1, 2, 4, 5 on page 8 from Lesson 2
  3. Read Lesson 3
  4. Finish writing up the Friday experiment in student lab notebook for Monday check-off.

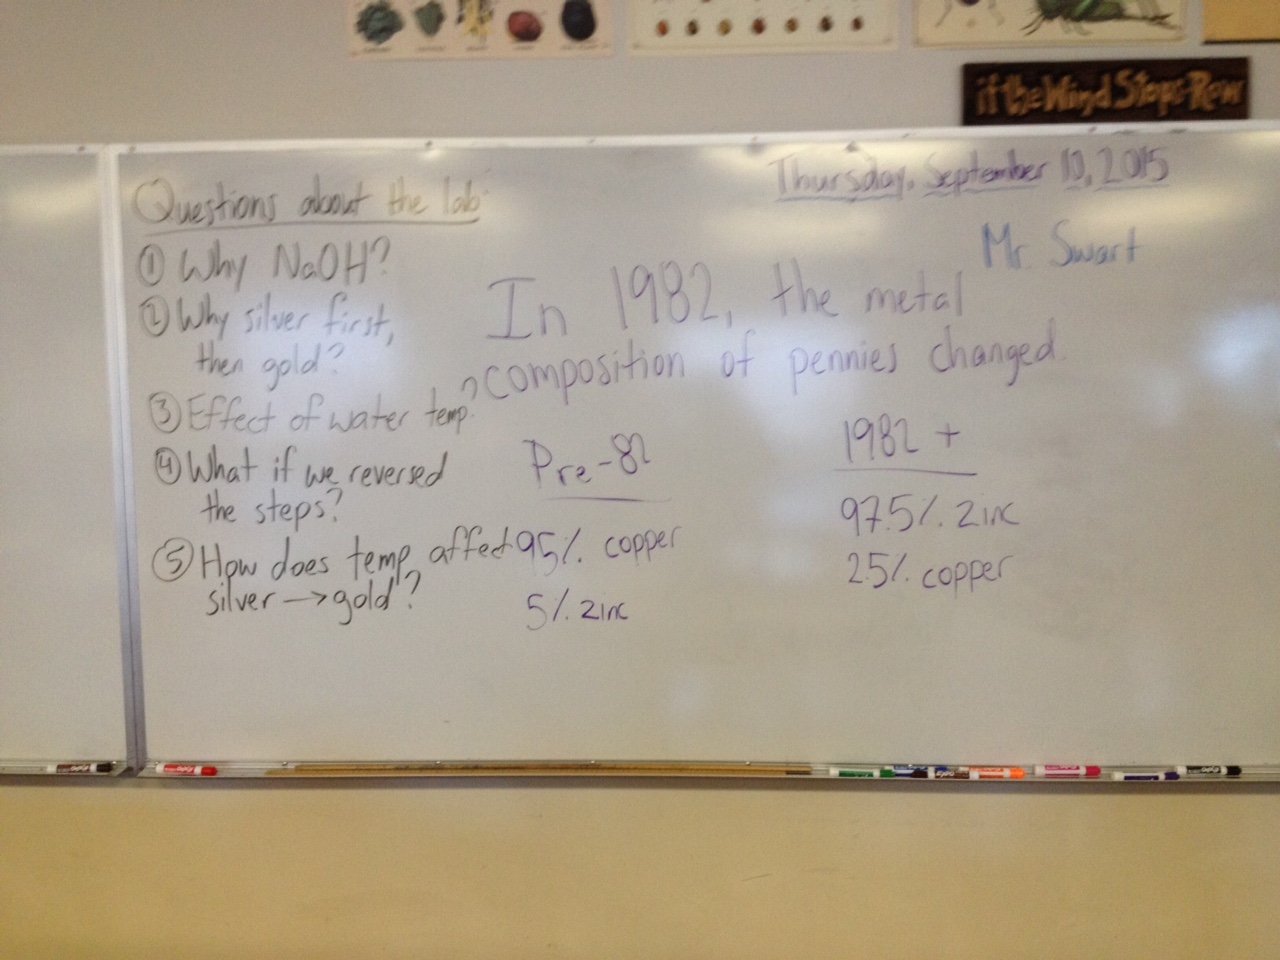
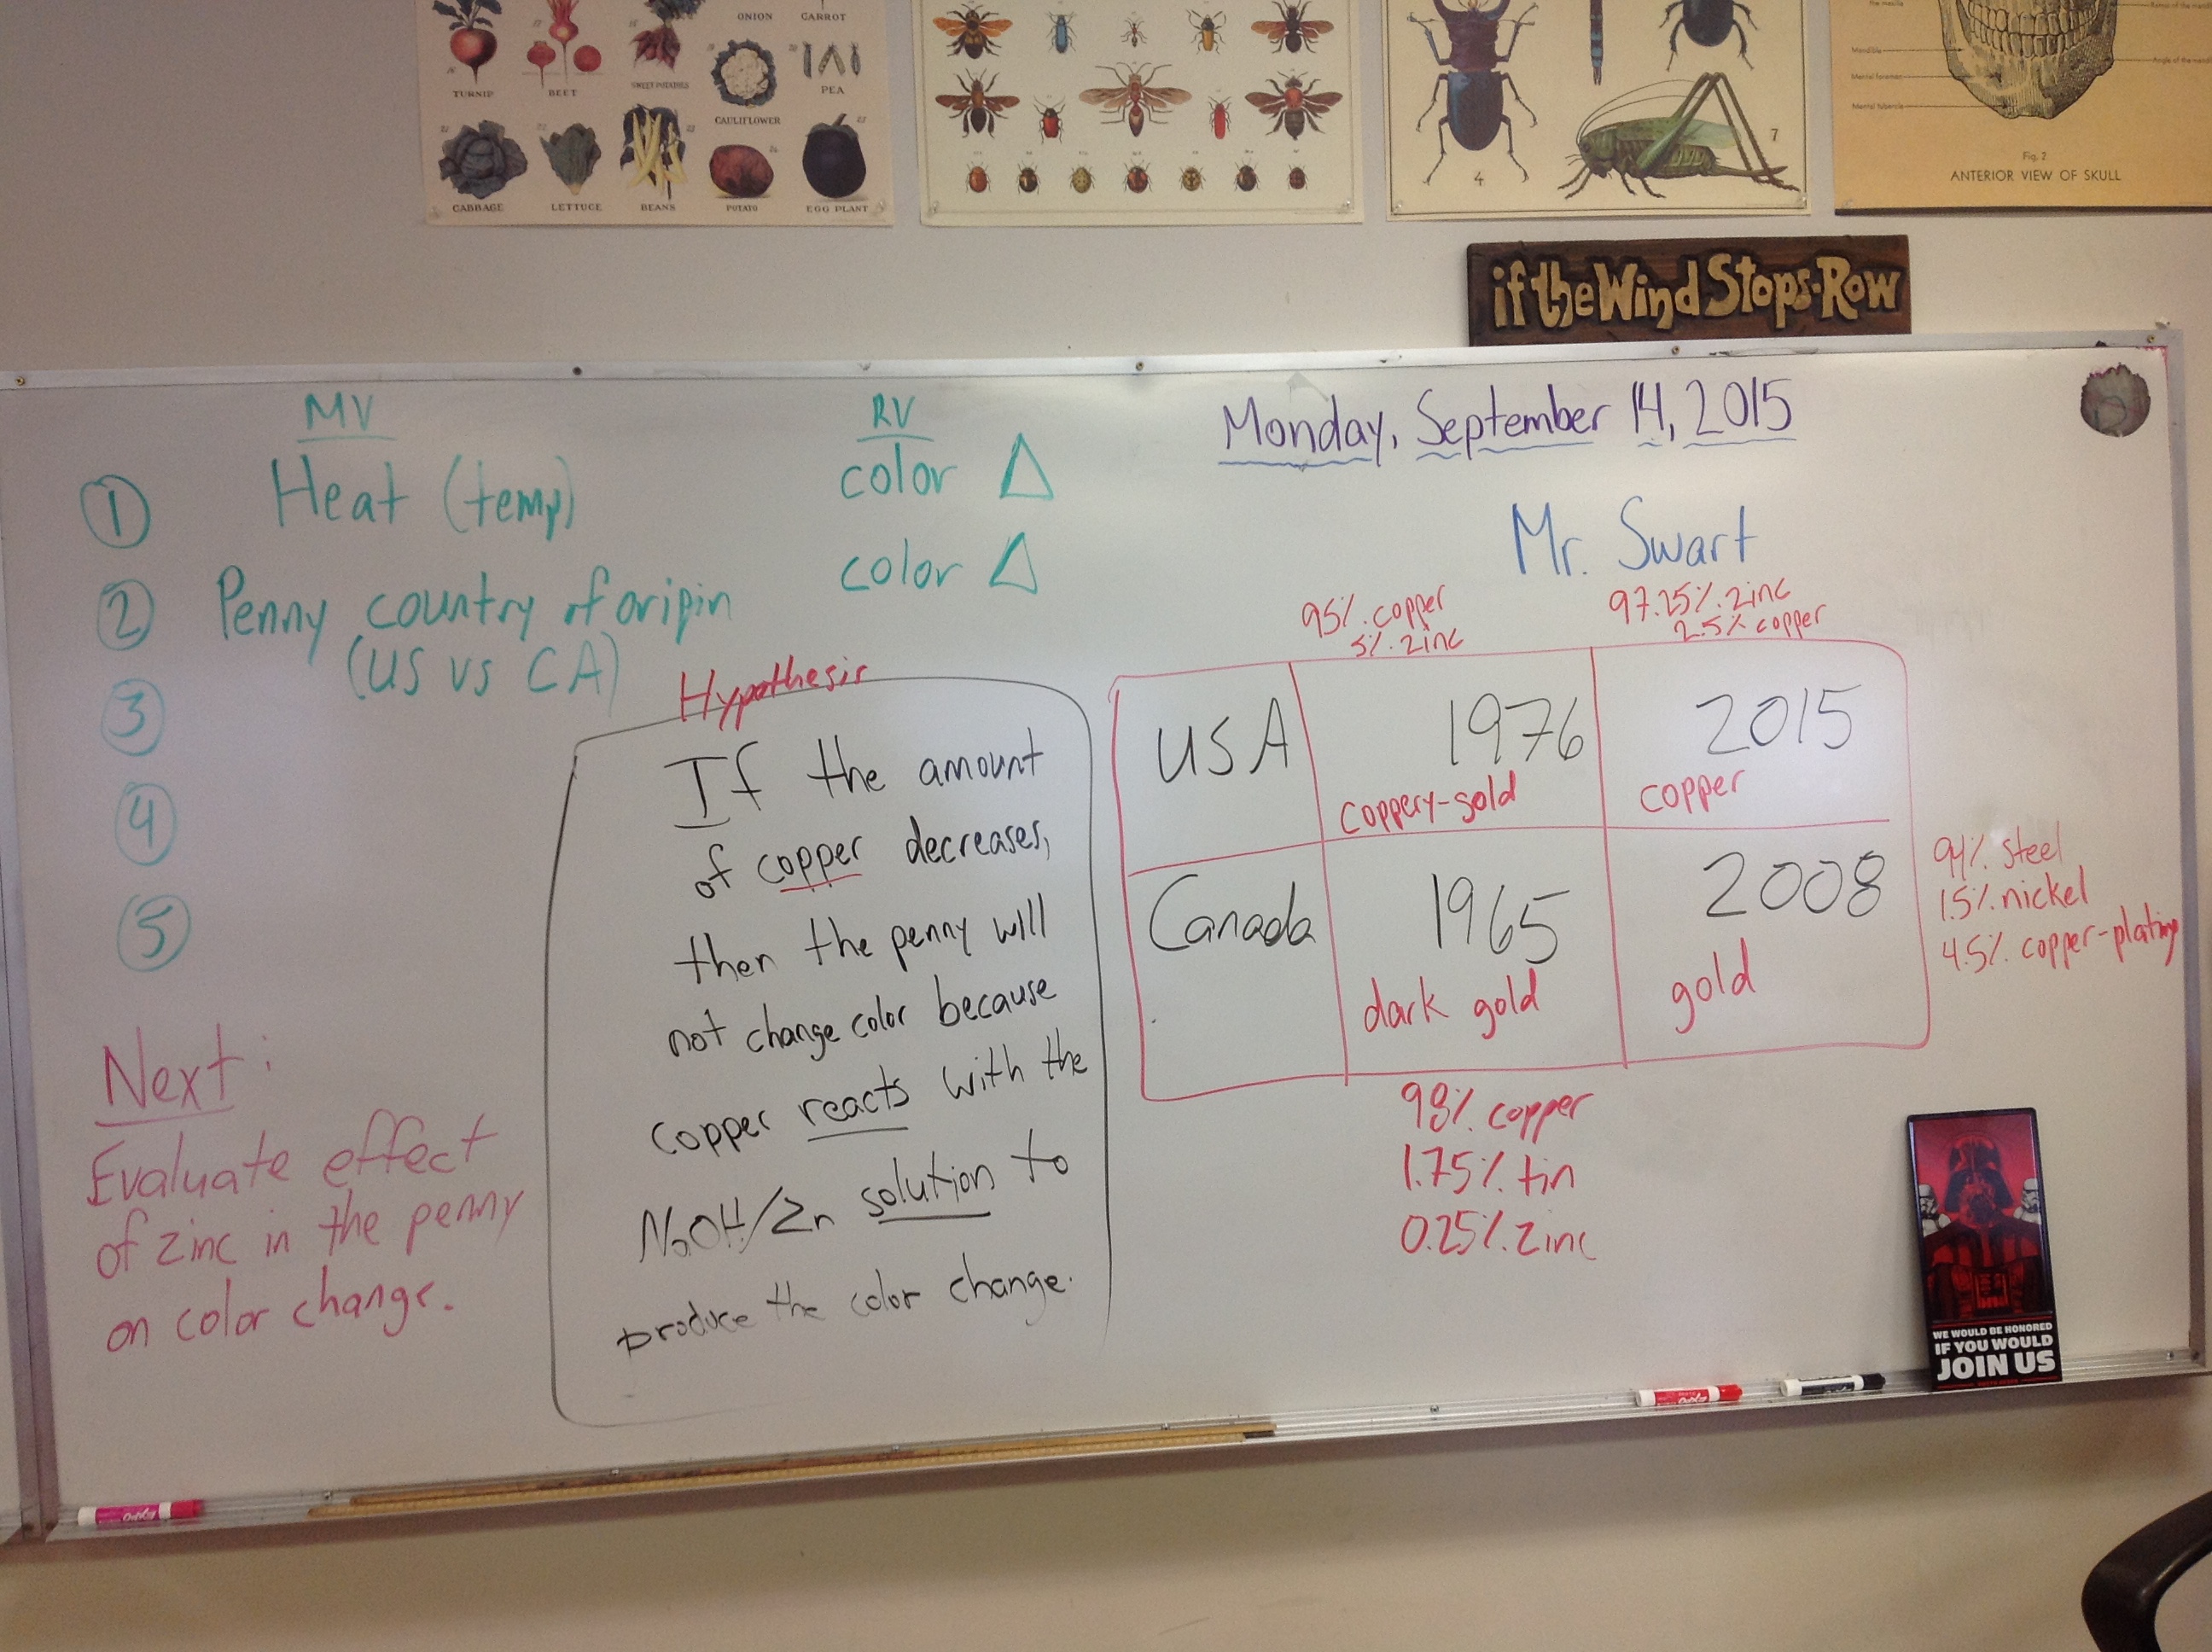
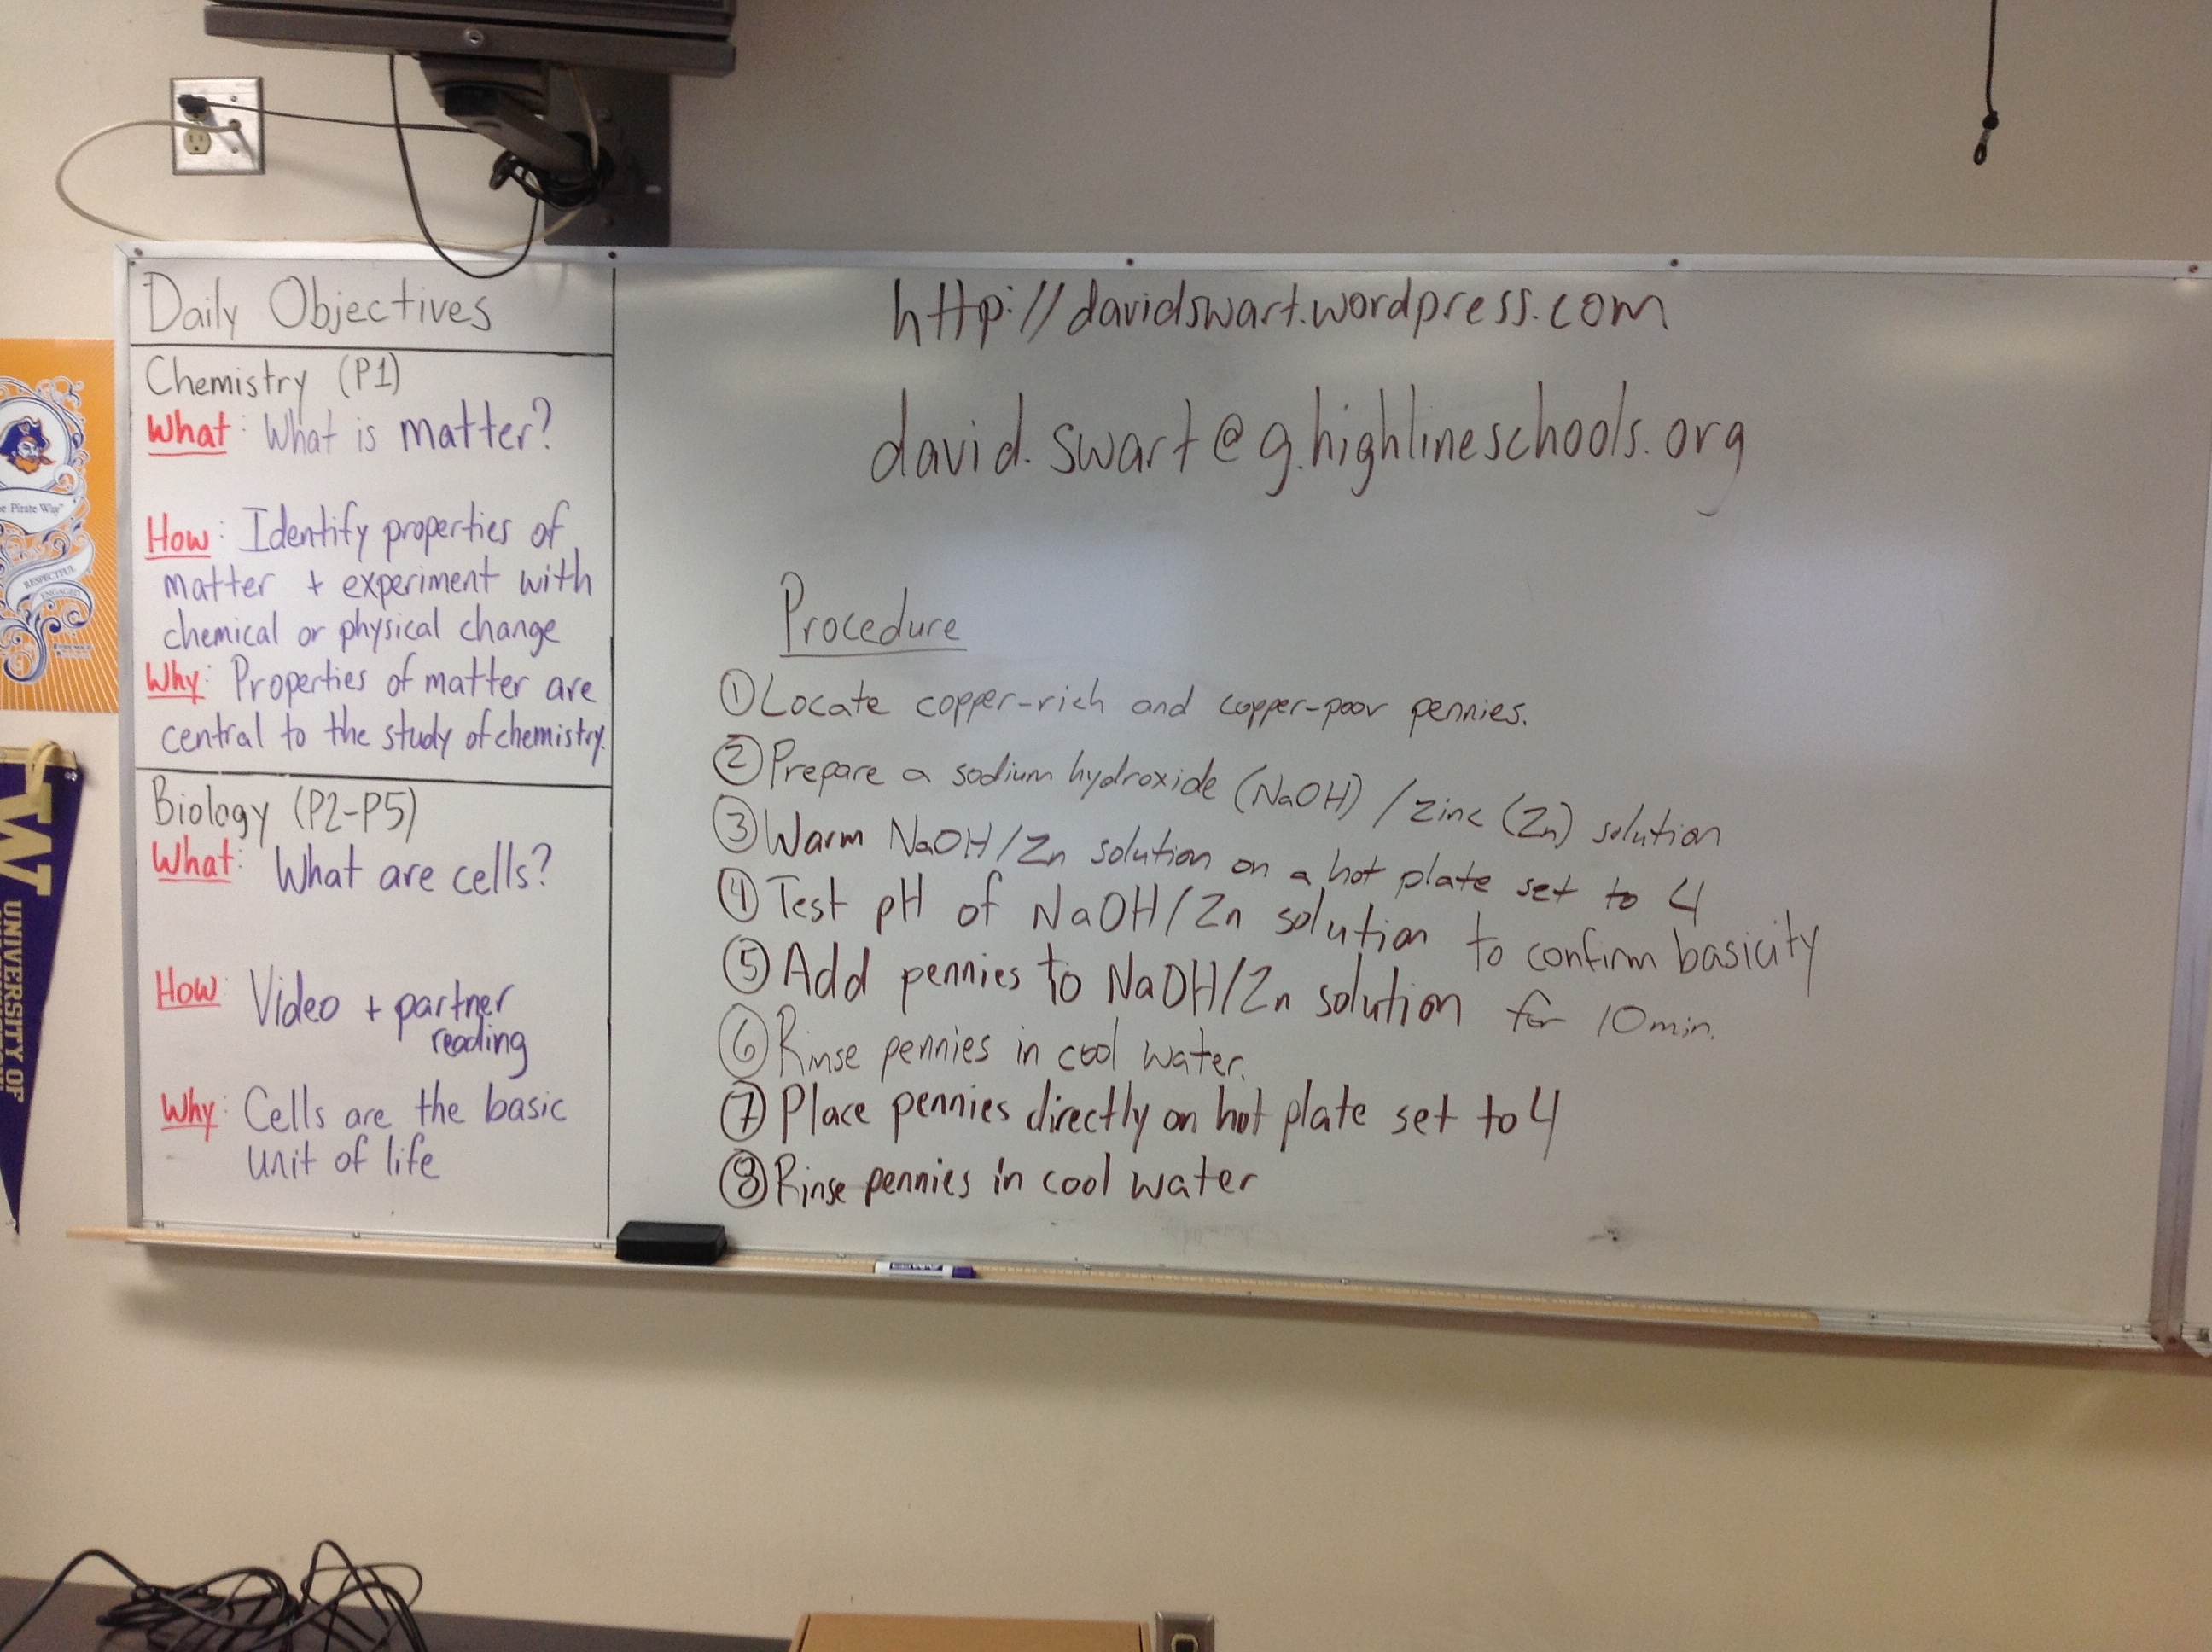
Monday (9/14): We modified the plan from Friday and decided to re-visit the demonstration approach for the Penny Lab.  At the beginning of class, students were asked to share their hypothesis for the lab from last Friday.  Students worked together to identify the manipulated and responding variables within their hypothesis statements, and a few brave students shared their variables with the class.  We decided to use the class period to test whether pennies from the USA (pre-1982 and post-1982) exhibited different properties when placed in sodium hydroxide and zinc compared with pennies from Canada.  We used Canadian pennies from 1965 and 2008 based on their differing metal composition (given in the picture below).  We also crafted a class hypothesis statement and then wrote down each step of the experiment to document the procedure (below).  At the end of the experiment, students described the color change and the pennies were photographed (also below).  We wrapped up by noticing the color change in today’s experiment appeared to be inversely proportional to the amount of zinc in the pennies (i.e. the less zinc in the penny, the more gold color it became), thus completing one cycle of the scientific process.

IMG_0032

IMG_0033

IMG_0036